Skip to content
  • English
    • French
    • Italian
    • Spanish
    • German
    • Dutch
    • Portuguese (Portugal)
    • Greek
    • Polish
  • English
    • French
    • Italian
    • Spanish
    • German
    • Dutch
    • Portuguese (Portugal)
    • Greek
    • Polish
Logo Avidsen
  • Products
    • Products
    • Avidsen Brand
    • Extel Brand
    • Philips Brand
    • Thomson Brand
  • Support
    • Tutorials on repair and use
    • Avidsen Technical Support
    • Extel brand technical support
    • Philips technical support
    • Thomson Technical Support
  • The Group
    • The Group
    • Contact
  • Ethic Company
  • Where to buy ?
\

Setting the delay time on a CA2B9

  1. Home
  2. Setting the delay time on a CA2B9

Setting the delay time on a CA2B9

Follow this tutorial to modify the wait time before auto-close for a CA2B9 card.

This tutorial is applicable for:

Avidsen - 114457 - Orea 500 Plus / Avidsen - 114459 - Zénia 250 / Avidsen - 114460 - Orea 550 / Avidsen - 114461 - Orea Connect / Thomson - 510063 - Swip 200 / Thomson - 510064 - Swip 500
Difficulté : Easy
Temps nécessaire : 5 minutes minutes
Nombre d’étapes : 5
Mise à jour : February 2025

Explanations in video:

Tutorial steps:

Board

Before making this setting, please ensure that you have activated the auto-close mode in the card settings.

Step 1: Enter card settings

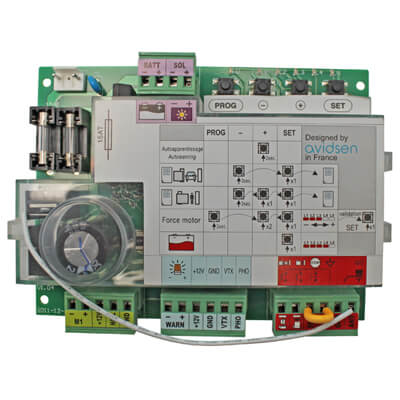
Press the “PROG” button on the board for 3 seconds (L1 lights up).

Step 2: Select the Timer submenu

Press “+” 4 times (L5 lights up).

Step 3: Enter the Timer submenu

Press “SET” once (L1 is lit by default).

Step 4: Choose the delay time

Press the “+” or “-” buttons on the board to turn the red LEDs on the board on or off.

L0 on = 15s

L1 on = 30s

L1L2 on= 45s

L1L2L3 on= 60s

L1L2L3L4 on = 75s

L1L2L3L4L5 on = 90s

Step 5: Confirm programming

Press “SET” once (all LEDs light up then go out).

Keep in touch
Youtube Linkedin

Follow us on social networks

About Avidsen
  • Who are we?
  • Contact
  • Who are we?
  • Contact
Support
  • Avidsen Technical Support
  • Extel brand technical support
  • Philips technical support
  • Thomson Technical Support
  • Avidsen Technical Support
  • Extel brand technical support
  • Philips technical support
  • Thomson Technical Support
Avidsen group brand
  • Avidsen Brand
  • Extel Brand
  • Philips Brand
  • Thomson Brand
  • Avidsen Brand
  • Extel Brand
  • Philips Brand
  • Thomson Brand
Copyright 2025 © All rights reserved Avidsen
  • Legal Notice
  • Personal data protection policy
  • Terms and Conditions of Use
  • Legal Notice
  • Personal data protection policy
  • Terms and Conditions of Use
Thank you for your rating!
Thank you for your rating and comment!
This page was translated from: French
Please rate this translation:
Your rating:
Change
Please give some examples of errors and how would you improve them: