Skip to content
  • English
    • French
    • Italian
    • Spanish
    • German
    • Dutch
    • Portuguese (Portugal)
    • Greek
    • Polish
  • English
    • French
    • Italian
    • Spanish
    • German
    • Dutch
    • Portuguese (Portugal)
    • Greek
    • Polish
Logo Avidsen
  • Products
    • Products
    • Avidsen Brand
    • Extel Brand
    • Philips Brand
    • Thomson Brand
  • Support
    • Tutorials on repair and use
    • Avidsen Technical Support
    • Extel brand technical support
    • Philips technical support
    • Thomson Technical Support
  • The Group
    • The Group
    • Contact
  • Ethic Company
  • Where to buy ?
\

Philips WelcomeEye Connect 2 Simplified Wifi Association

  1. Home
  2. Philips WelcomeEye Connect 2 Simplified Wifi Association
Podłączony wideofon - WelcomeEye Connect 2

Philips WelcomeEye Connect 2 Simplified Wifi Association

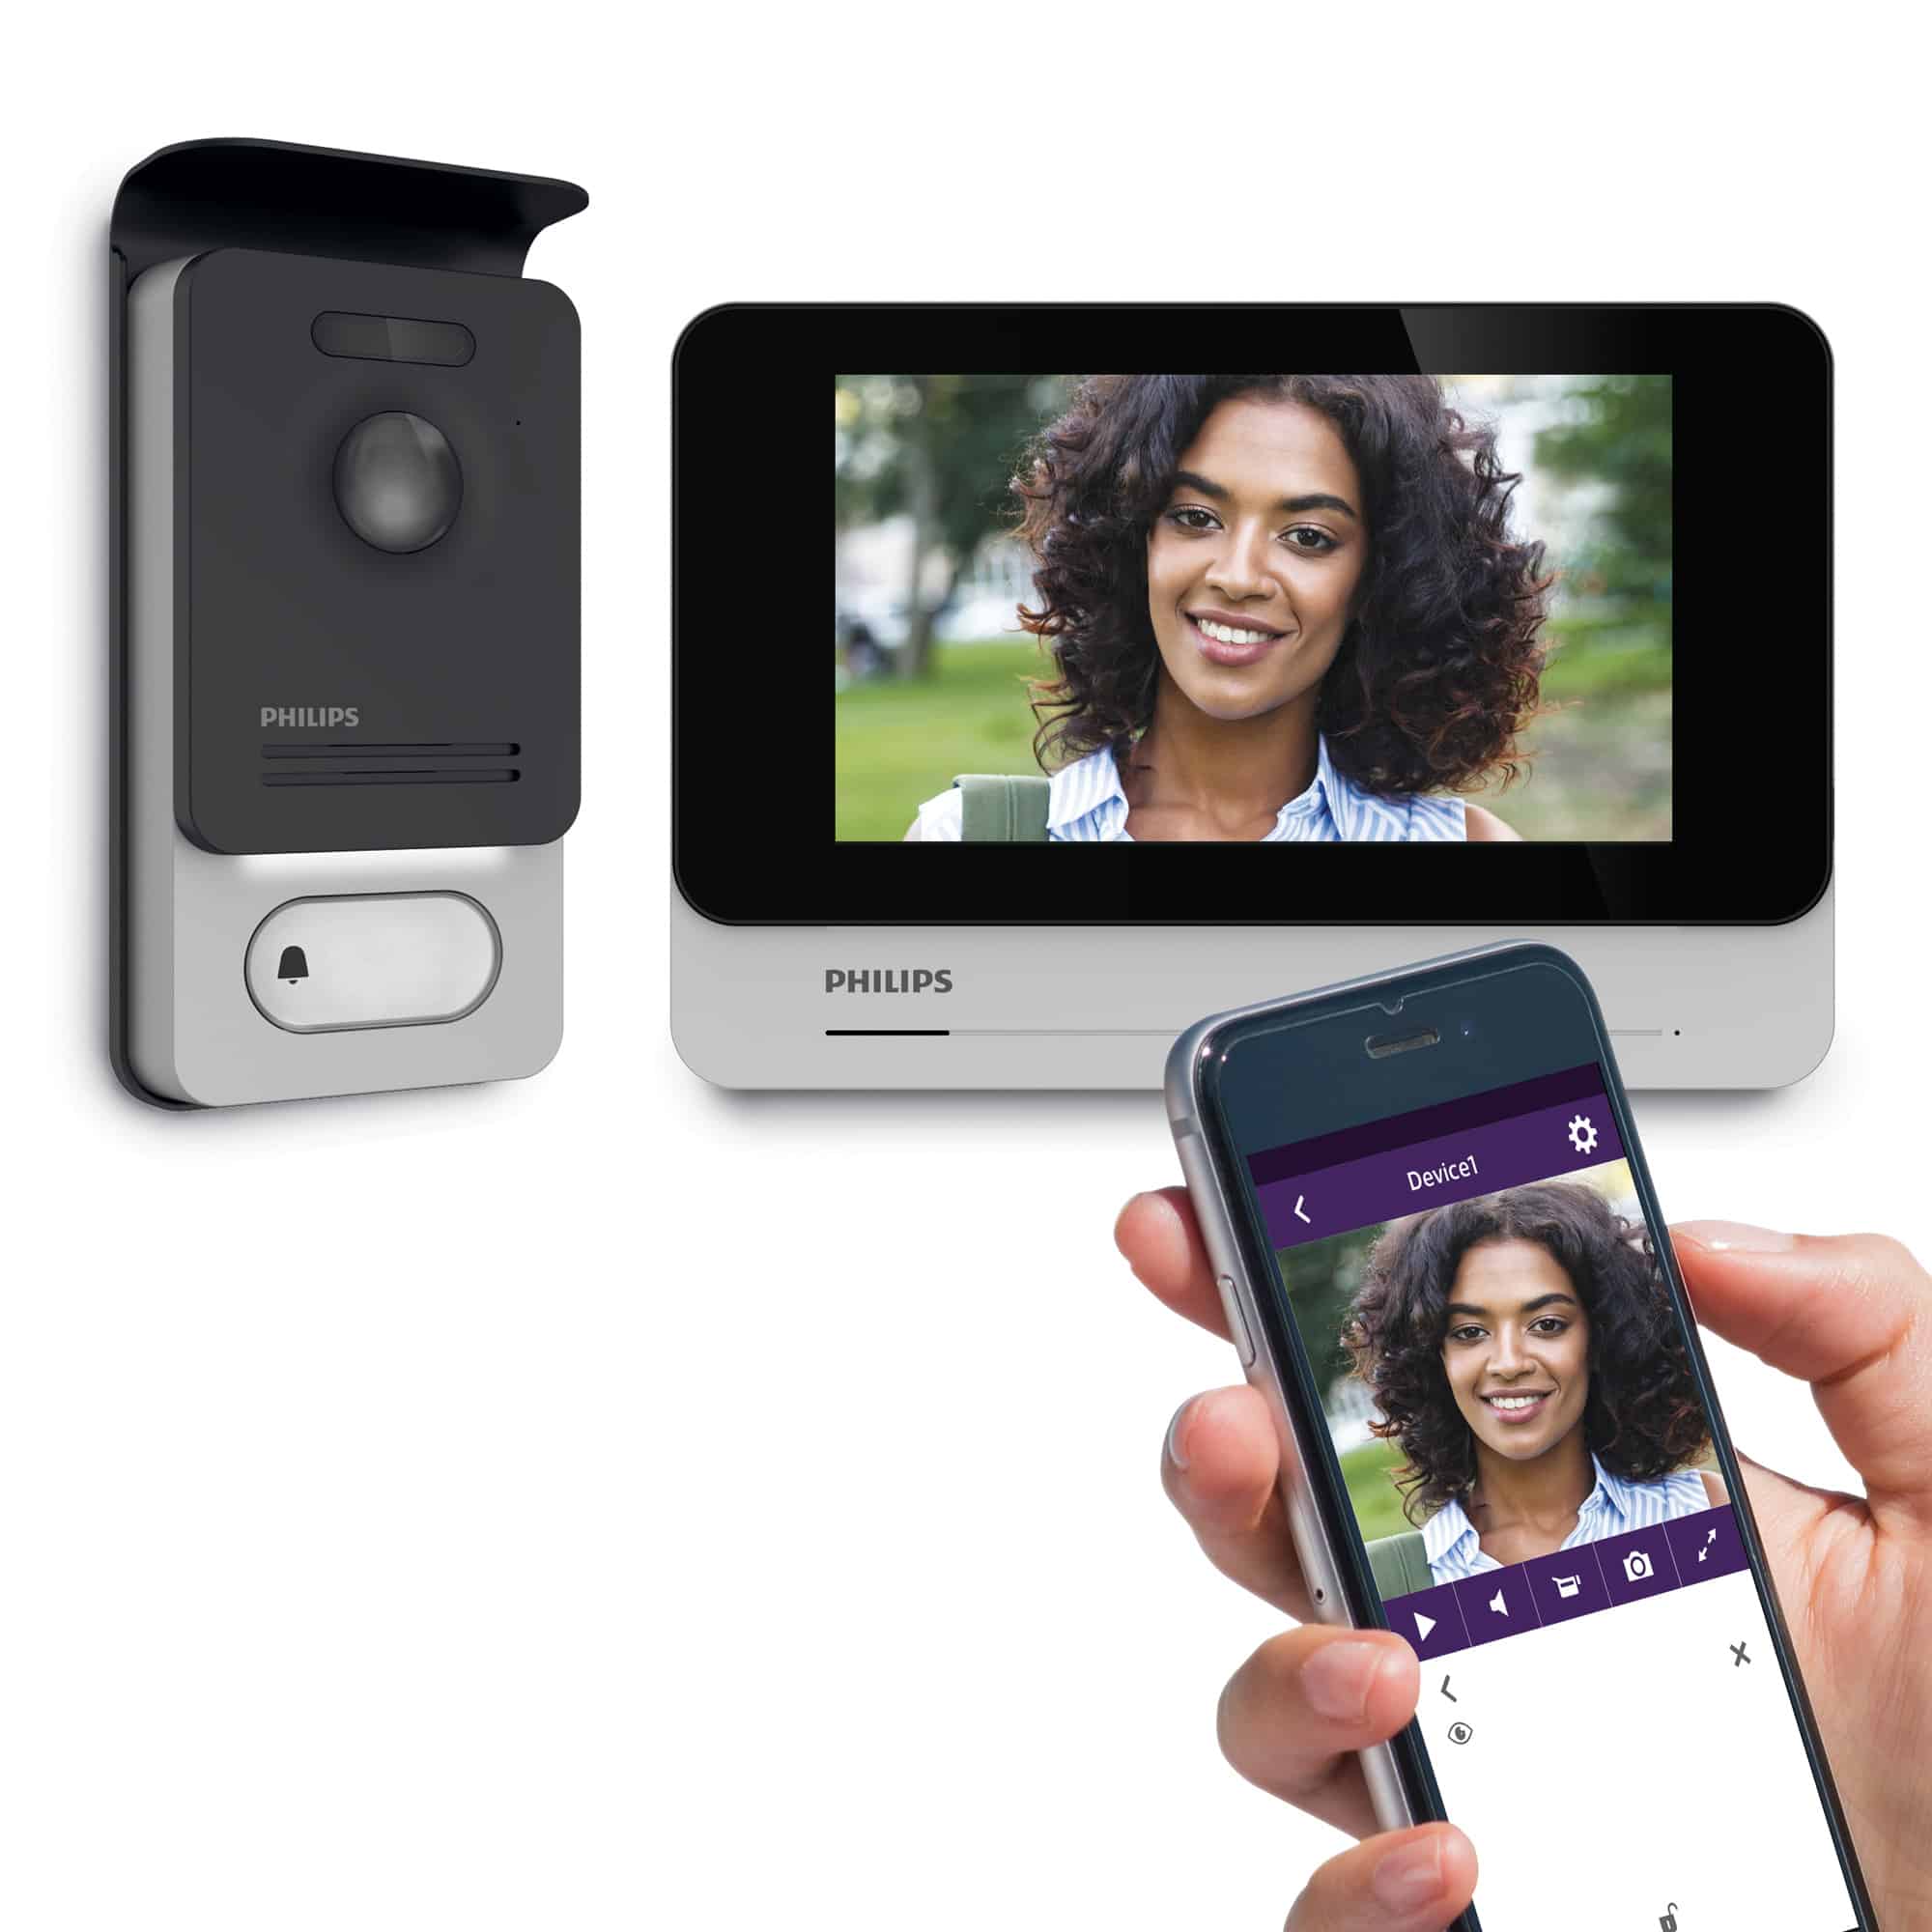
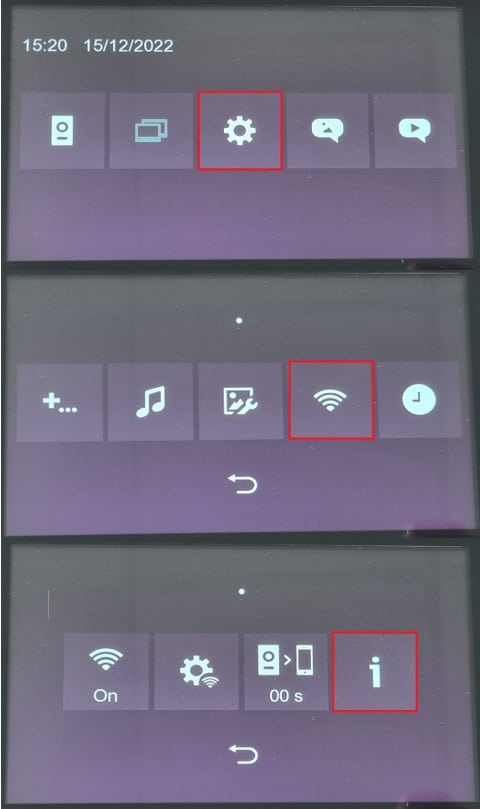
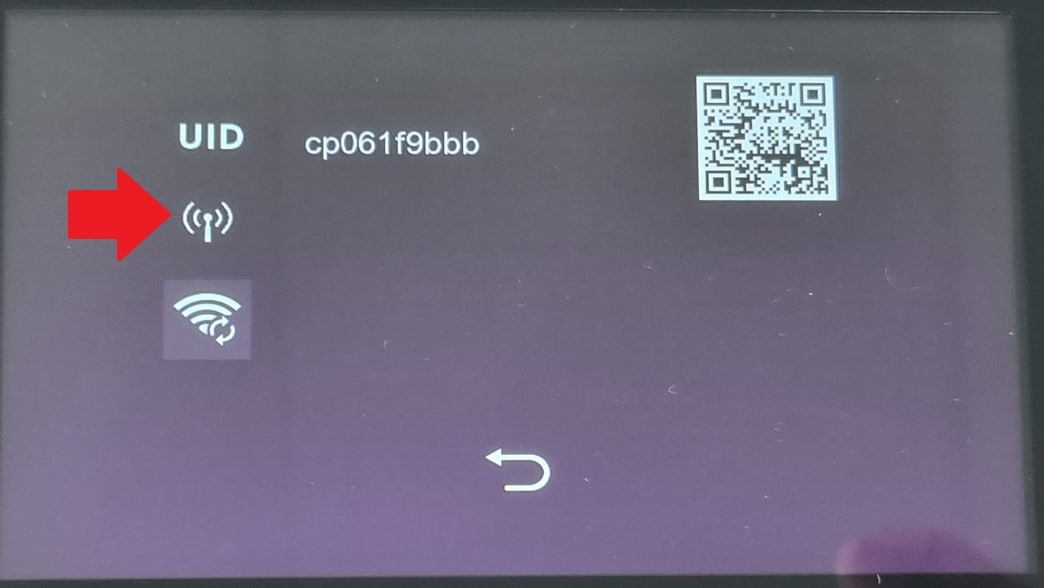
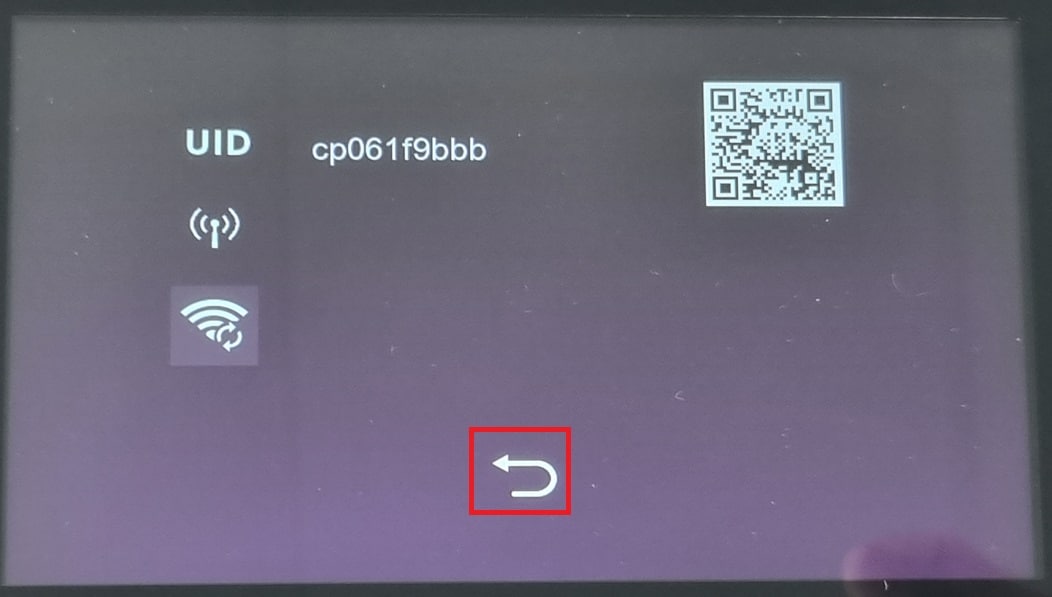
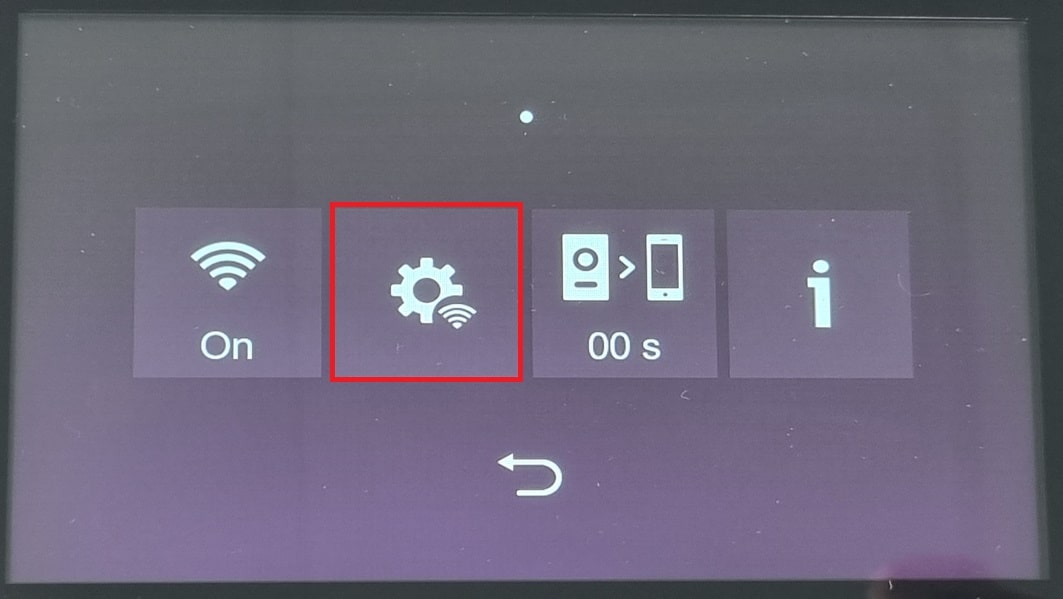
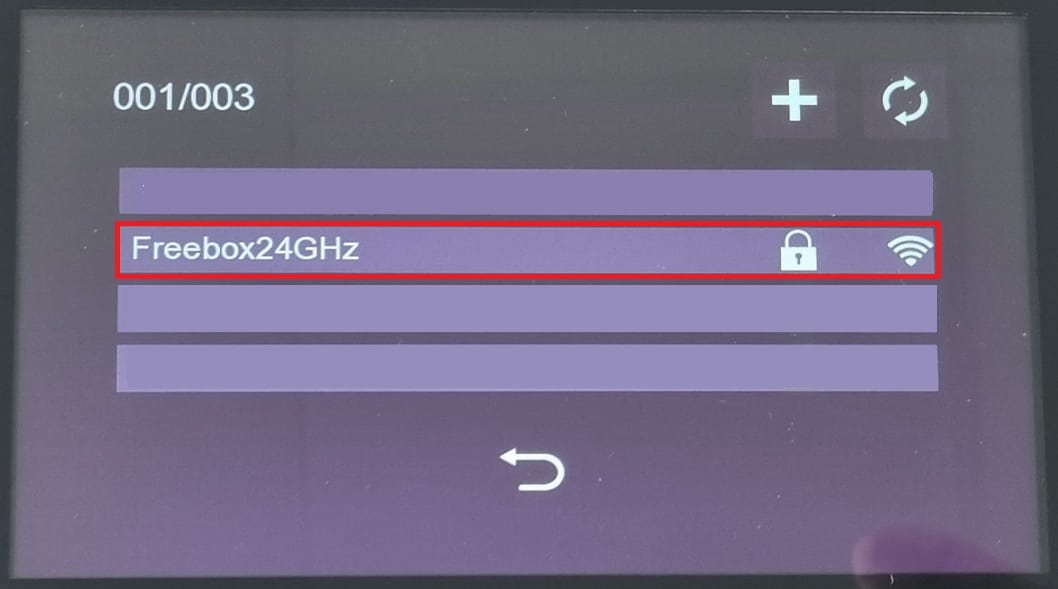
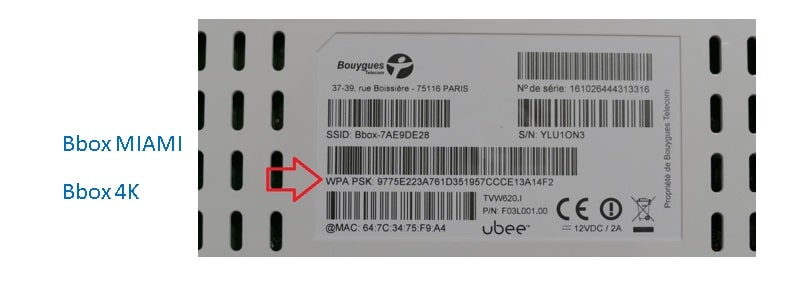
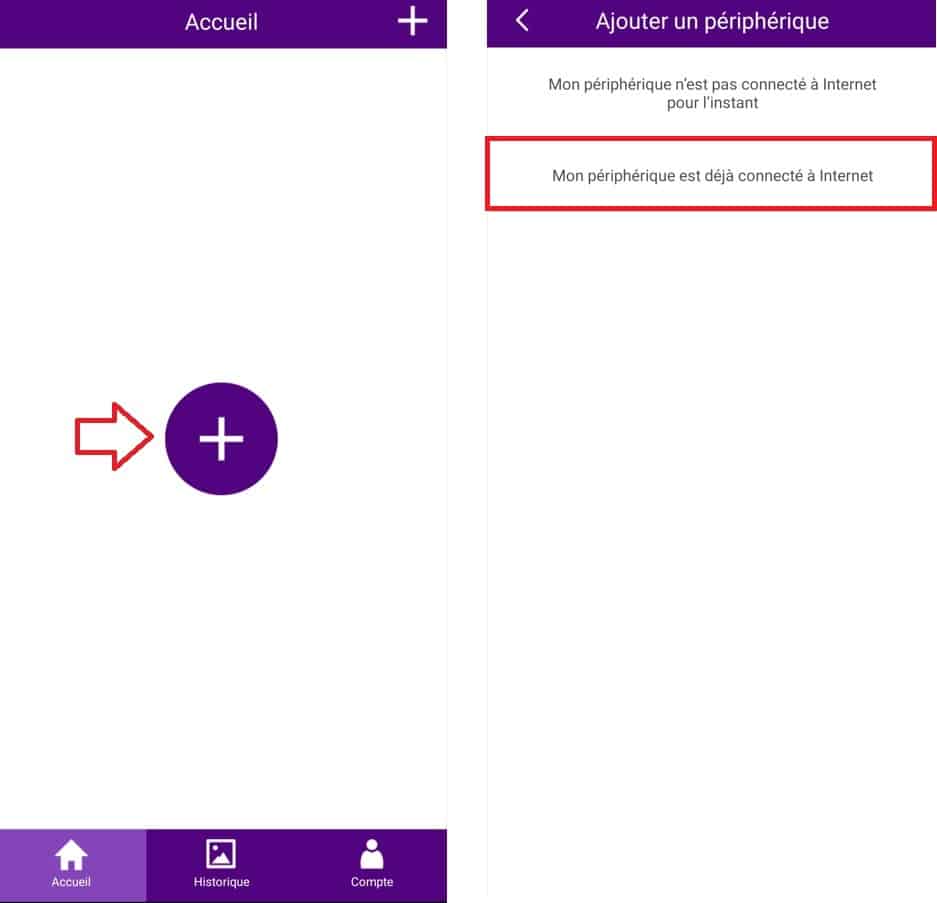
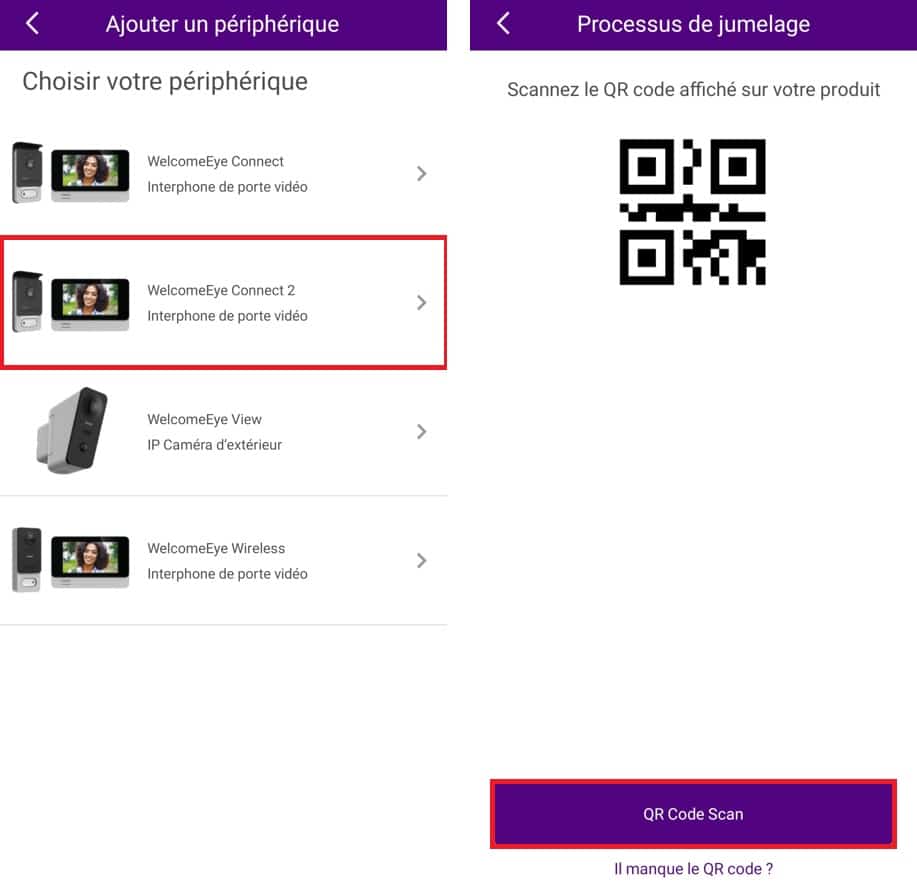
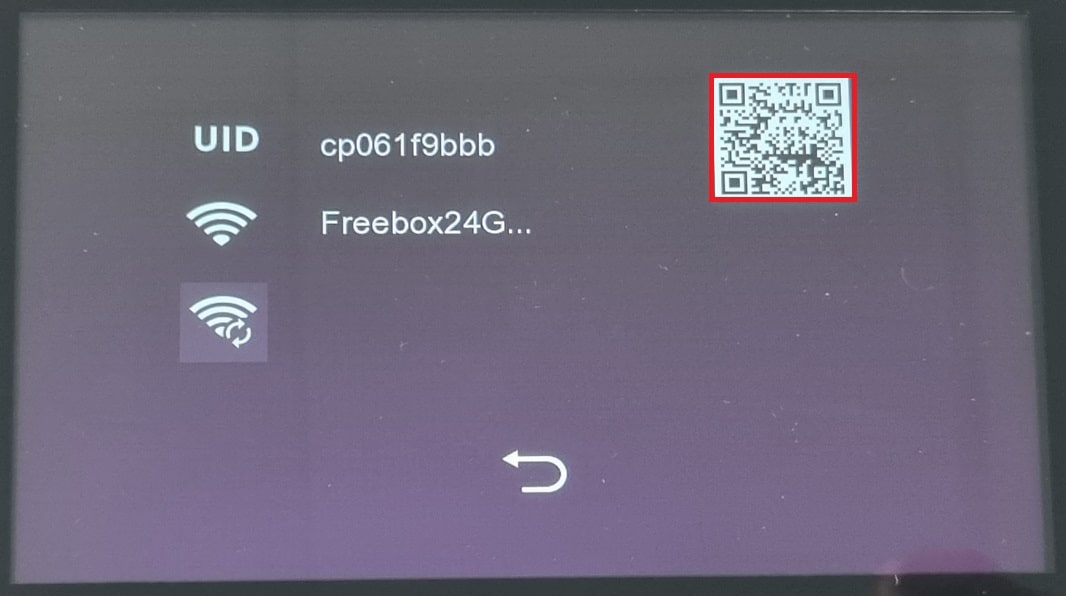
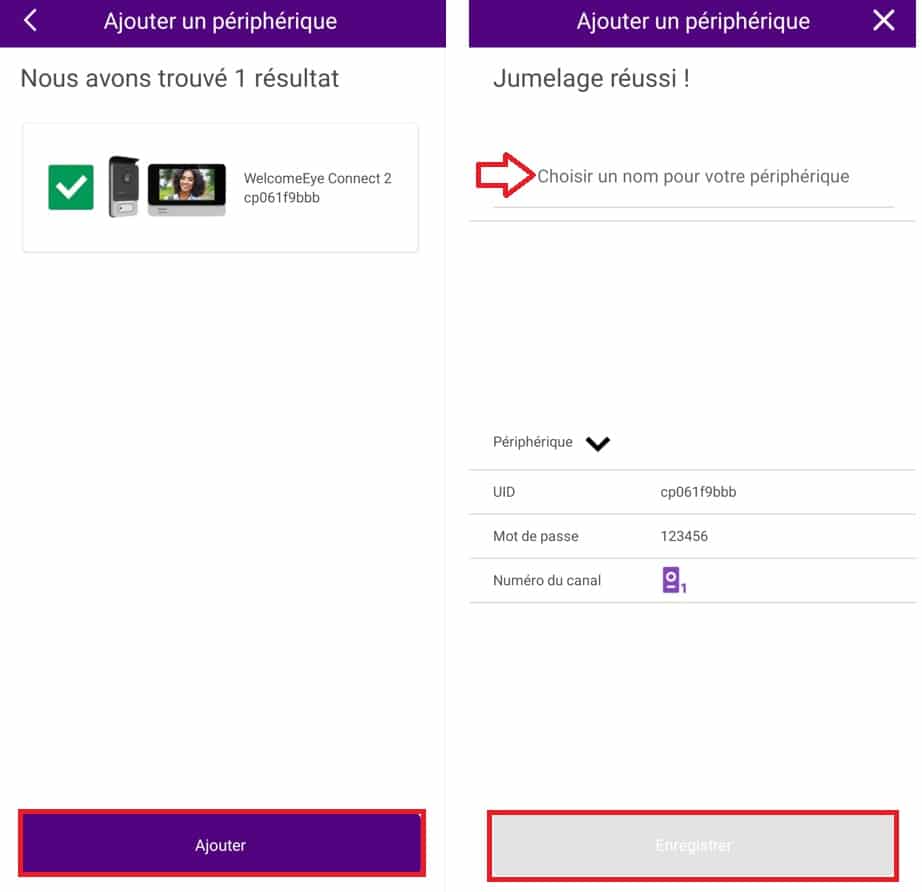
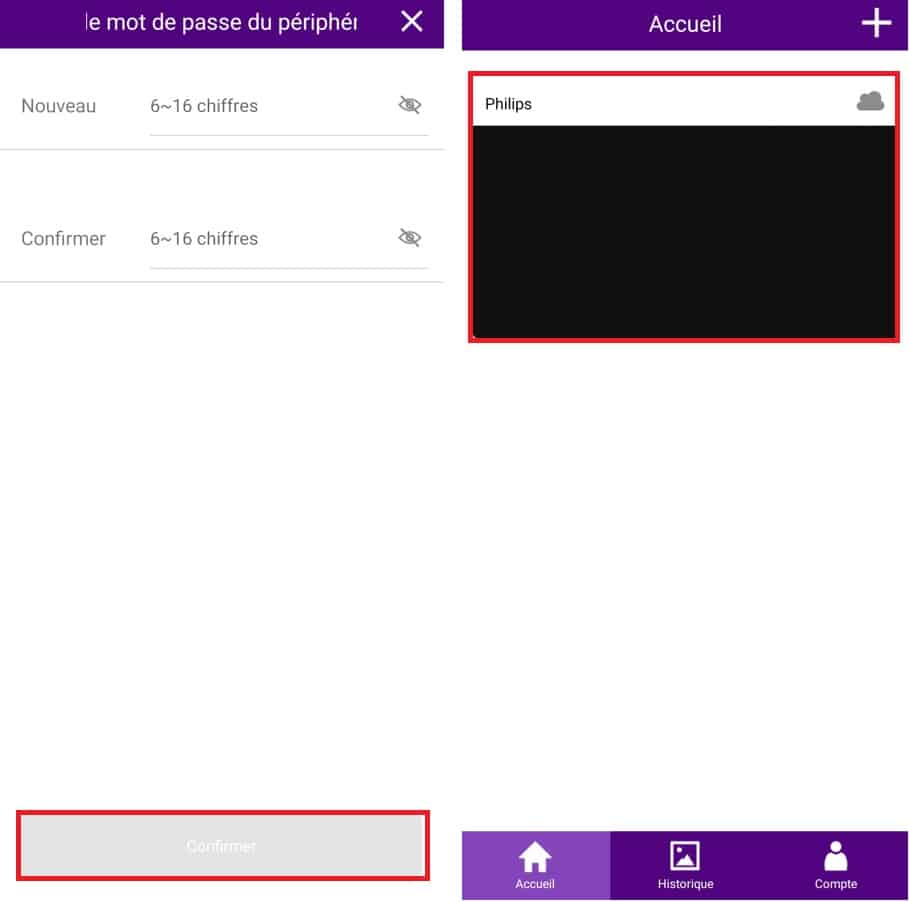
Having trouble connecting your smartphone to your Philips WelcomeEye connect 2 monitor? Here's a quick and easy procedure to perform this operation

This tutorial is applicable for:

Philips - 531036 - WelcomeEye Connect 2
Difficulté : Easy
Temps nécessaire : 15 minutes
Nombre d’étapes : 7
Mise à jour : February 2025

Explanations in video:

Tutorial steps:

Step 1: Check monitor connection status

  • First, you’ll need to check the monitor’s connection status.
  • Enter monitor settings
  • Then Wifi
  • Then Info

Step 2: Check that the monitor's wifi is empty

  • Make sure the second icon represents
  • If not, please click on reset wifi
  • Click on arrow to return to the previous menu.

Step 3: Select the Wifi Manual settings menu

  • Click on the second icon representing a wifi logo and a cogwheel.

Step 4: Select your Internet box

  • The Philips WelcomeEye monitor will scan all compatible Internet boxes in the vicinity.
  • Select the name of your Internet box by clicking on it. In our example: “Freebox24Ghz”.

Step 5: Enter your Internet box's wifi key

  • Now manually enter the wifi key for your Internet box, then confirm.
  • If you’ve never changed the wifi key on your Internet box, or don’t know where to find it, please follow the instructions below.

Step 5.1: Where to find the ORANGE operator WiFi key

  • LiveBox 4 = The wifi key is visible by clicking on the i on the front of your Livebox.
  • LiveBox 5 = The wifi key is located on the identification card and also on the label on the back of your Livebox.
  • LiveBox 6 = The wifi key is visible in the Wifi settings accessible from the front screen.

Step 5.2: Where to find the SFR operator Wifi key

  • SFR NB6/NB7/NB8 = The wifi key is located on the label on the back of your SFRBox.

Step 5.3: Where to find the Bouygues operator Wifi key

  • Bbox Miami/ 4K = The wifi key is located on the label on the back of your Bbox. It’s the code on the WPA line.

Step 5.4: Where to find the Freebox operator Wifi key

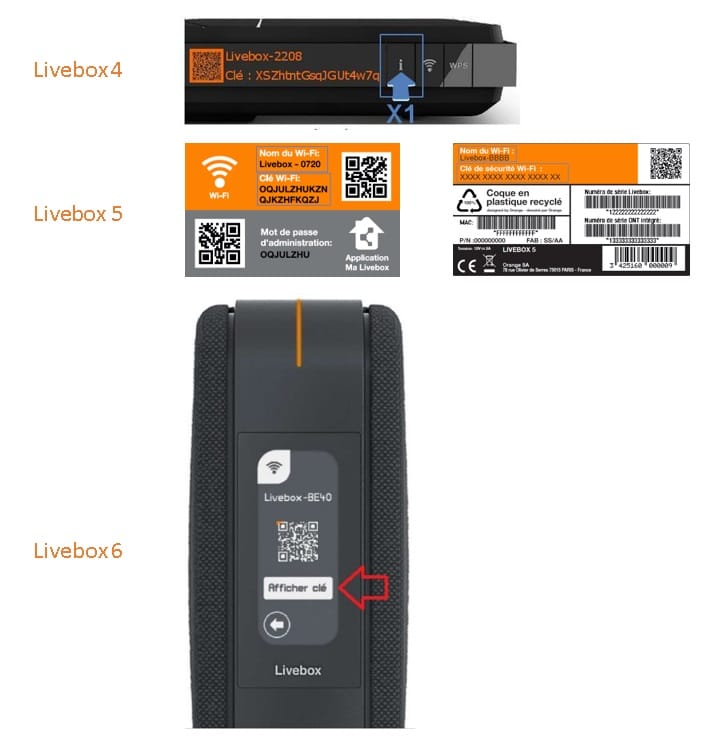
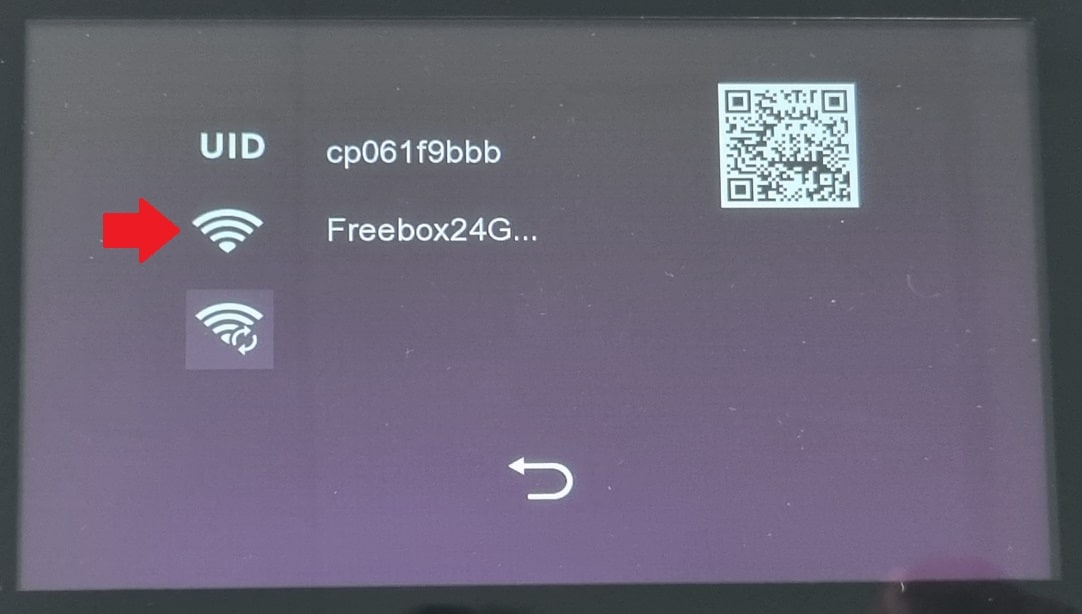
Valid for Freebox Delta/Pop/Révolution/mini/One/4G+/Crystal

  • Please download the “Freebox Connect” application available on the AppStore and Google Playstore.
  • Select your Freebox model and log in.
  • Your Freebox wifi key is located in the “My wifi access” menu.

Step 6: Connect the monitor to the Wifi network of your Internet box

  • After validating your wifi key, the Philips monitor will automatically return to the “Info” menu.
  • Please wait about 40 seconds for the monitor to connect.
  • The Wifi logo must remain fixed.
  • In the event of a connection error or if the logo is not fixed, please find the error code description.

Step 7: Connection with the smartphone

  • Now take your smartphone and install the “Philips WelcomeEye” application, available from the AppStore or googlePlay store.
  • During the entire procedure, if the application asks you for authorizations, please authorize them.
  • Click on the “+”.
  • Click on “My device is already connected to the Internet”.
  • Select WelcomeEye Connect 2 video door entry system.
  • Click on “QR code Scan”.
  • Your smartphone’s camera willactivate.
  • Scan the QR code of the Philips monitor from its interface Setting -> Wifi -> Info.
  • The Philips monitor should be found by the application.
  • Select it and click on “Add”.
  • Choose a name for your Philips monitor and click “Save”.
  • Change the default password for the Philips monitor. Remember: the default password is 123456. You cannot use it.
  • Your monitor is now connected.
  • Please click on your monitor to view intercom panel live.
Keep in touch
Youtube Linkedin

Follow us on social networks

About Avidsen
  • Who are we?
  • Contact
  • Who are we?
  • Contact
Support
  • Avidsen Technical Support
  • Extel brand technical support
  • Philips technical support
  • Thomson Technical Support
  • Avidsen Technical Support
  • Extel brand technical support
  • Philips technical support
  • Thomson Technical Support
Avidsen group brand
  • Avidsen Brand
  • Extel Brand
  • Philips Brand
  • Thomson Brand
  • Avidsen Brand
  • Extel Brand
  • Philips Brand
  • Thomson Brand
Copyright 2025 © All rights reserved Avidsen
  • Legal Notice
  • Personal data protection policy
  • Terms and Conditions of Use
  • Legal Notice
  • Personal data protection policy
  • Terms and Conditions of Use
Thank you for your rating!
Thank you for your rating and comment!
This page was translated from: French
Please rate this translation:
Your rating:
Change
Please give some examples of errors and how would you improve them: